 The Windows Malicious Software Removal Tool was always a very enigmatic Windows Update for me. I always installed it both on my Windows XP and Windows Vista PCs and never really understood how it works and if it works. After I installed it, I did not see any new shortcuts or programs running in the background, not even new notification messages. It was as if I installed an update which did not do anything.
 Recently, I went to one of my friend's house and installed Windows Vista on his PC. Of course, Windows Update installed Windows Malicious Software Removal Tool on his PC as well. When he asked me about this tool and how it works, I was not able to give him any answers. To answer his questions and any of your questions about this tool, I decided to do a little digging and write this article to share with you all there is to know about the Windows Malicious Software Removal Tool.
What is Windows Malicious Software Removal Tool (mrt.exe)?
Microsoft Windows Malicious Software Removal Tool is basically a free tool which helps to remove specific malicious software from computers which run Windows operating systems, including all versions of Windows Vista. This tool is updated on the second Tuesday of every month and it is distributed via Windows Update. After it is installed, it silently runs in the background and removes the malicious software that it finds. When the detection and removal process is complete, the tool generates a report describing the outcome of the scan. The report can be found in a log file named 'mrt.log' placed in the 'C:\Windows\Debug' folder.
Even though this tool helps you remove malicious software, it should never be used as a replacement for an antivirus program. That's because this tool has a very limited database of malicious software and searches only for specific threats. Also, it is updated on a monthly basis unlike antivirus solutions which are updated daily.
Where to find it
By default, the tool can be found in the 'C:\Windows\System32' folder. Once you open this location, search for a file called mrt.exe.
If you don't find this file, it means that this tool is not installed on your PC. In this case you can download it directly from the Microsoft Download Center. The 64 bit version can be found here.
How to use it in interactive mode
If you want to run this tool manually, go to the location mentioned above and double click the mrt.exe file. An easier way is to type mrt.exe in the Start Menu Search Box or in the Run window.
Alternatively, you can download the Windows Malicious Software Removal Tool Shortcut we have attached to this article, place it on your desktop and use it each time you want.
When the tool starts, you will receive an UAC prompt. Click Continue and the tool will start.
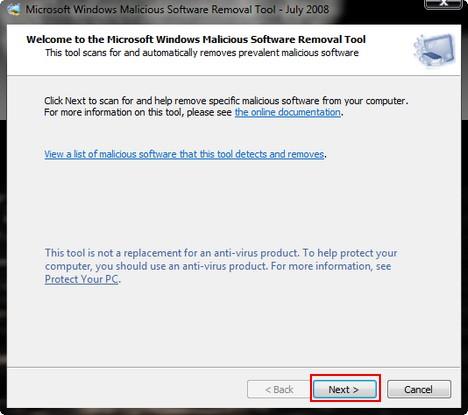
When you see the Welcome window, click Next.

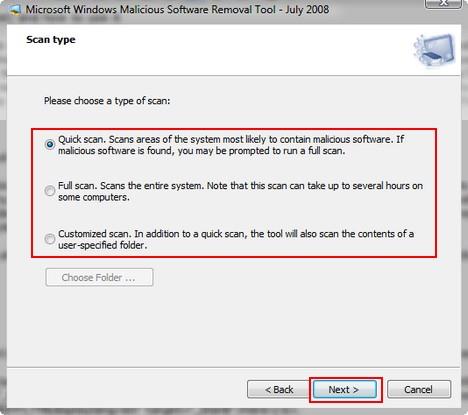
Now you need to select the type of scan you want the tool to perform. You have three possible options: Quick scan, Full scan and Customized scan. If you did not scan your PC before and you don't have a reliable antivirus solution installed, you might want to select Full scan. Once you selected the option you prefer, click Next.

The tool will start to scan your computer and show you the status of the scan.

When finished you will see the results. In my case, no malicious software was detected. Now click Finish and the tool will close.

How to use it from the Command Prompt
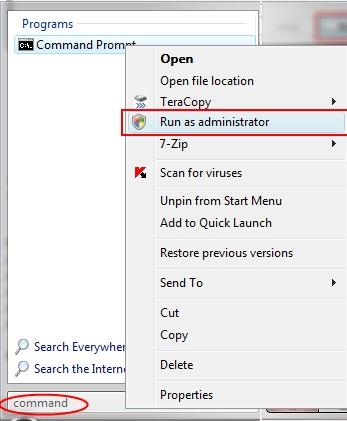
You can use this tool from the Command Prompt as well. To use it, right click the Command Prompt shortcut and select 'Run as administrator.

Now type 'mrt.exe ' followed by one of these possible switches:
- /Q or /quiet - runs the tool in quiet mode. This option suppresses the user interface completely;
- /N - runs in detect-only mode. In this mode, any detected malicious software will be reported but it will not be removed;
- /F - performs a full scan of the computer without removing any infections that are found;
- /F:Y - performs a full scan of the computer and automatically cleans all the found infections;
- /? or /help - displays usage information.

If you are running the tool in quiet mode, you can find the log file mrt.log in the 'C:\Windows\Debug' folder. To easily open this file, you can download the attached shortcut, place it on your desktop and double click on it.
Source Site: Windows Vista for Beginners - Windows Vista tutorials
Source Article: How To Use Windows Malicious Software Removal Tool
Last edited by Doctor Inferno on 18th November 2008, 4:00 am; edited 1 time in total


