
Hidden wireless networks are those networks which do not broadcast their Network ID (SSID). While not that many people use such networks, it definitely ads a bit more security to have your home wireless network hidden from unwanted guests. In this guide I will share with you what details you need to know in order to connect to such networks and what are the steps for making a successful connection.
First and foremost, you need to know all the identification and connection details of the hidden wireless network you want to connect to. Therefore, open your router's configuration page and go to the Wireless configuration menu. Write down the values for the Network ID (SSID) and Security fields. Depending on what type of security your wireless network has, you will need to write down the value of another important field, as following:
NOTE: If your wireless network has no security enabled, then you need to know only the value of the Network ID (SSID) field. 802.1X, WPA and WPA2(AES) security is generally used in enterprise networks and most likely your laptop will be pre-configured to connect to your corporate wireless network. Therefore this guide won't apply to corporate networks.
Once you have all these three details, you can go ahead with step 2.
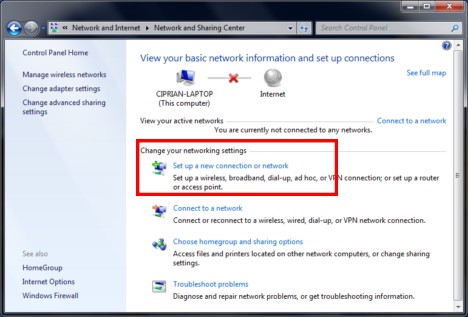
To do this, you need to open the Network and Sharing Center: go to Start Menu -> Control Panel -> Network and Internet -> Network and Sharing Center. In the Network and Sharing Center window you will see lots of shortcuts. Click on the one that says 'Set up a new connection or network'.
The 'Set Up a Connection or Network' wizard will now start. From the list of available options, select 'Manually connect to a wireless network' and click on Next.

Now you will have to complete all the fields shown in this window. The first one is called Network name. In it, type the name of the wireless network you want to connect to, which is the equivalent of the Network ID (SSID) field from your router's wireless configuration menus.

The next field that needs to be completed is the Security type used by your wireless network. Depending on the type of security used, make the following selection:
NOTE: If your wireless network has no security enabled, then select No authentication (Open).
Now it is time to select the appropriate type of encryption. If you are using WPA2-PSK(AES) security, make sure you select AES. Otherwise, leave the default value Windows 7 gives you.
For WEP, WPA2 Personal and WPA Personal you will have to enter the security key:
If you are in a public environment, then it is a good idea to check the Hide characters box. Also, don't forget to check the other two boxes: 'Start this connection automatically' and 'Connect even if the network is not broadcasting'. These two allow you to connect automatically to the hidden wireless network. Once all data is completed, click on Next.
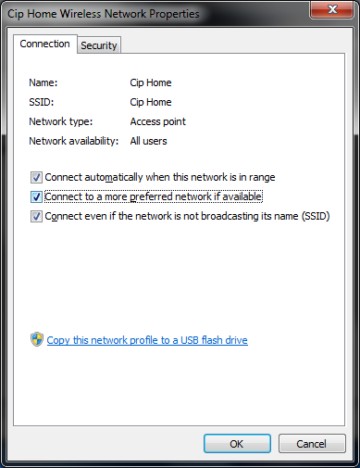
When done, you will see a message which says that you have successfully added the wireless network to your computer. If you are unsure on any of the settings, you can click on 'Change connection settings' and review them all.
This will open a window where you can change all your settings and looks like the screenshot below. It can be opened at any time by going to Control Panel -> Network and Internet -> Network and Sharing Center -> Manage Wireless Networks and double clicking on the wireless network.
When done, Windows 7 will automatically connect to the hidden wireless network. Also, the wireless network icon from the taskbar will change as shown below.

7Tutorials source
Step 1: Get the Details of the Hidden Wireless Network
First and foremost, you need to know all the identification and connection details of the hidden wireless network you want to connect to. Therefore, open your router's configuration page and go to the Wireless configuration menu. Write down the values for the Network ID (SSID) and Security fields. Depending on what type of security your wireless network has, you will need to write down the value of another important field, as following:
- For WEP security - note the value of the WEP Key field.
- For WPA-PSK, WPA2-PSK(AES) security - note the value of the Preshare Key field.
NOTE: If your wireless network has no security enabled, then you need to know only the value of the Network ID (SSID) field. 802.1X, WPA and WPA2(AES) security is generally used in enterprise networks and most likely your laptop will be pre-configured to connect to your corporate wireless network. Therefore this guide won't apply to corporate networks.
Once you have all these three details, you can go ahead with step 2.
Step 2: Start the 'Set Up a Connection or Network' Wizard
To do this, you need to open the Network and Sharing Center: go to Start Menu -> Control Panel -> Network and Internet -> Network and Sharing Center. In the Network and Sharing Center window you will see lots of shortcuts. Click on the one that says 'Set up a new connection or network'.
The 'Set Up a Connection or Network' wizard will now start. From the list of available options, select 'Manually connect to a wireless network' and click on Next.
Step 3: Complete the Details of the Wireless Network
Now you will have to complete all the fields shown in this window. The first one is called Network name. In it, type the name of the wireless network you want to connect to, which is the equivalent of the Network ID (SSID) field from your router's wireless configuration menus.
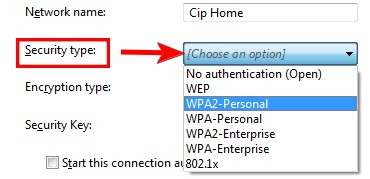
The next field that needs to be completed is the Security type used by your wireless network. Depending on the type of security used, make the following selection:
- For WEP security - select WEP.
- For WPA-PSK security - select WPA-Personal.
- For WPA2-PSK(AES) security - select WPA2-Personal.
NOTE: If your wireless network has no security enabled, then select No authentication (Open).
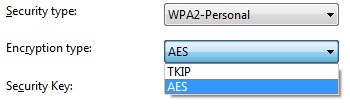
Now it is time to select the appropriate type of encryption. If you are using WPA2-PSK(AES) security, make sure you select AES. Otherwise, leave the default value Windows 7 gives you.
For WEP, WPA2 Personal and WPA Personal you will have to enter the security key:
- For WEP security - the value of the WEP Key field.
- For WPA-PSK, WPA2-PSK(AES) security - the value of the Preshare Key field.
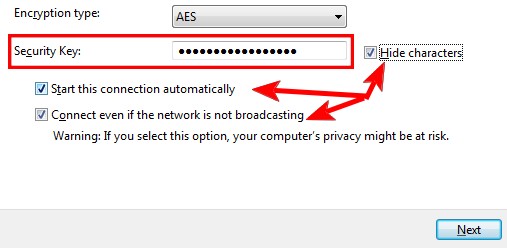
If you are in a public environment, then it is a good idea to check the Hide characters box. Also, don't forget to check the other two boxes: 'Start this connection automatically' and 'Connect even if the network is not broadcasting'. These two allow you to connect automatically to the hidden wireless network. Once all data is completed, click on Next.
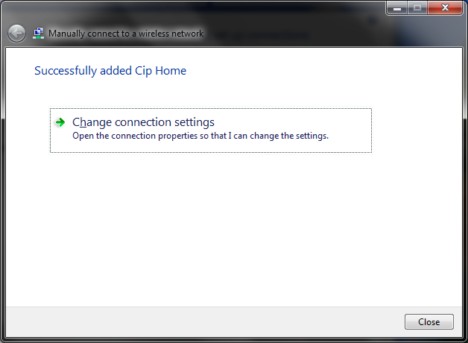
When done, you will see a message which says that you have successfully added the wireless network to your computer. If you are unsure on any of the settings, you can click on 'Change connection settings' and review them all.
This will open a window where you can change all your settings and looks like the screenshot below. It can be opened at any time by going to Control Panel -> Network and Internet -> Network and Sharing Center -> Manage Wireless Networks and double clicking on the wireless network.
When done, Windows 7 will automatically connect to the hidden wireless network. Also, the wireless network icon from the taskbar will change as shown below.
7Tutorials source