This tutorial will show you how to use the Snipping Tool so that taking screenshots will be much easier than before.
In the Start Menu Search bar type in Snipping Tool >> hit Enter.
You can also open it by navigating to Start >> Accessories >> Snipping Tool

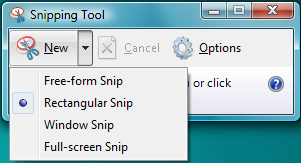
2. The Snipping Tool has four capture modes: Free-form Snip, Rectangular Snip, Window Snip and Full-Screen Snip. When you are ready to take a screenshot, click the New button.
- Free-form Snip - A small scissor will appear on the screen and with it you can select any parts of the screen.
- Rectangular Snip - Allows you to quickly draw a rectangle on the screen and capture everything inside it.
- Window Snip - Select a window with the mouse and the Snipping Tool will take a screenshot of it.
- Full-Screen mode - The Snipping Tool will capture your desktop and it will automatically exclude itself from the screenshot.
3. You may also want to get rid of that border around the Window Snip by clicking the Options button. You can also select different colours for the border.